Or in my case, grapefruit...what do you do? Well, I made grapefruit sorbet!
Did I ever tell you that my husband brews beer? Yep, he does! It's something he's tinkered with since we moved into our house, I'd say about 5 years now. What does this have to do with grapefruit, you ask? I'm getting to that! This week, he decided to branch out and experiment with his beer flavors. Normally, he sticks with the traditional pale ale, Hefeweizen, Belgian ale, things like that. He asked me what type of beer we should try and I immediately said something citrus. We did a little research and eventually came up with the idea of Grapefruit and Honey Ale. Does that sound delicious or what?!
So, he had to get 5 grapefruits and peel them all so he could steep the beer with the peels. That left us with 5 whole grapefruits with no peels. Of course, the normal thing to do would be to eat them. However, I was craving something cold and sweet, so I decided to make grapefruit sorbet! The recipe is really simple:
Grapefruit Sorbet
2 cups simple syrup
1 1/2 cups fresh grapefruit juice
For the simple syrup, add 2 cups sugar and 2 cups water to a saucepan and heat on medium-high heat until boiling. Lower heat until sugar is completely dissolved and let cool.
For the grapefruit juice, I strained mine to make sure no pulp or little seeds got into my sorbet.
Then, you just mix your simple syrup and grapefruit juice together, pour into your ice cream maker, and let it do its thing!
Voila!
If you're in the market for an ice cream maker, I have the Cuisinart Frozen Yogurt, Ice Cream and Sorbet Maker. I got mine at Costco a couple summers ago for about $35, and it has been really nice to make cold treats and know EXACTLY what goes into them. The machine also comes with a little recipe booklet to get you started. This particular recipe was a little on the sweet side for me, so next time I might not add the whole 2 cups of simple syrup and use more of a 1:1 syrup to juice ratio. I like my sorbet a little more tart!
Enjoy!
Showing posts with label cooking. Show all posts
4/22/2013
2/24/2011
Yummy Dinner!!
Things have been really busy around here the last week or so--last week was Billy's birthday and we've just had a lot going on around here! But we just had the yummiest dinner and I just had to tell you about it.
I've been trying to plan our meals ahead of time and shop according to the menu plan, while also keeping things light and healthy to work with our fitness and weight-loss goals. Something we really like to eat is tilapia and we tend to buy it in bulk at Costco every few weeks, repackage it into 2 filets in a freezer bag, and just pull it out of the freezer a day or two ahead of when we plan to cook it.
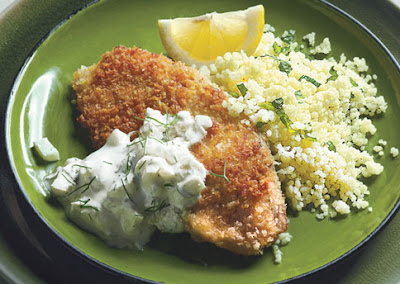
I came across a tilapia recipe in Bon Appetit (I think in the January or February issue) and it looked easy, quick, and tasty so I gave it a shot tonight and BOY, WAS IT GOOD!! So good, I ate it right up before I could get a photo, but here's what it looks like:

Image from BonAppetit.com
Doesn't that look good? All you do is pat the tilapia fillets dry and sprinkle salt on both sides. Whisk an egg white until frothy, and brush the fish with the egg whites--I suppose you could dip the fish in the egg whites, too, if that floats your boat! Then you dredge the fish in the panko breadcrumbs. Cook in 3 tbs of vegetable oil over medium-high heat in a nonstick skillet for about 2-3 minutes until the panko is golden brown and crispy. Put on paper towel to drain any remaining oil on the fish. That's pretty much it!
I did a little steamed broccoli with our fish and the whole thing was done in less than 15 minutes. It was light and fresh, healthy, and EASY. Perfect for a busy night after work or if you really just don't feel up to the whole production of making a big meal.
I also made a little lemon aioli with it--sort of like a fancy tartar sauce. I don't really measure the stuff, but I guess it's about a 1/2 cup of mayonnaise (we use the light version), a bit of lemon zest, juice from half a lemon, a clove of garlic (minced), and salt and pepper. Some fresh dill would be good in there, too. Stir until combined and add more lemon juice if it looks too thick.
Trust me! Try it! It is so good!
2/06/2011
Pasta with Pecorino and Pepper
A few weeks ago I was at Costco and guess who hopped in my buggy?
The Barefoot Contessa.
I just love her cookbooks. She actually hopped in my buggy twice--I also got her newest cookbook How Easy Is That? One of the many things I love about her food is how simple yet elegant it is. So, I flipped through and decided to try:The Pasta with Pecorino and Pepper. So, I got all my stuff ready...
This recipe actually calls for egg noodles. I've never cooked with them before and I can't recall that I've ever had them before, but you just cook them like regular noodles.
Now, if there was a tricky part, this would be it. Once you get the noodles back in the pan, you have to work quickly. Reading the recipe before hand, it seemed that having all of my ingredients ready to go would be super helpful here, so that's what I did, and it worked great. You throw in the cream, butter, salt, pepper, cheese!, and parsley and toss it all together.
The creamiest, most perfect and delicious bowl of pasta! The egg noodles were tender and definitely had a different flavor to them than the regular whole wheat pasta I normally cook with. A nice departure from the norm, and I think I'll cook with them more in the future. I've not cooked with Pecorino much either, and it seems to me like it's a softer version of Parmesan. Nutty flavor, kinda salty. Coming from someone whose favorite pasta dish is anything involving Alfredo sauce, this was definitely a very simple yet elegant (and yummy!) recipe.That Ina doesn't disappoint!
I hope everyone has a wonderful Sunday and a fun time watching the Superbowl! I don't really have a preference to who wins today, but I'm looking forward to our friends coming over and spending time with them. On the menu: Taco Soup (since it's easy and feeds a lot of people), spinach dip, and chocolate chip cookies!
And just an FYI--"buggy" in the south is the same thing as a shopping cart. ;)
11/23/2010
What's been cookin'...
Here's a little bit of what we've been cooking around here lately...
Zesty Chicken Enchiladas

Recipe out of Real Simple

They are super good. Tangy and zesty from the tomatillos with lots of gooey melted Monterey Jack on top!
A favorite: Roasted Veggie Orzo
an Ina Garten recipe

I think this is all I ate that day. Really hard to stay away from it! Easy recipe and good for a crowd. My friends often say "bring the orzo!" if we're all bringing something for a party.
Potato-Zucchini Pancakes
A Giada recipe
Those were super tasty--would be great for a party, especially a Christmas/Holiday party since there is Rosemary in them. Mmm!White Bean Dip
This was a recipe out of the Everyday Italian book I've been cooking from. A great, easy little snack to whip up. Just a few ingredients: White kidney beans, lemon, parsley, olive oil, s&p! I've also made the Marinara Sauce out of that book and it's really fresh and full of tomato flavor! I can't wait to try the fried calamari to dip in it. Completely different from the usual spaghetti sauce I make, which has brown sugar in it (somewhere, an italian woman just rolled in her grave...).I can't believe Thanksgiving is in 2 days! BG's parents are coming up, so it'll just be the 4 of us...and 3 dogs. I'm making my mom's traditional turkey, dressing, and gravy, but I thought I'd mix up the sides and try some Pioneer Woman recipes. I'm going to make the Whiskey Glazed Carrots (had these at a friend's house once, delicious!), Creamy Herbed Potatoes (made these for Easter this year, delicious!), and Green Bean Casserole (this one's different...it has peppers! And bacon!). We got everything from Trader Joe's, even the turkey. Their cornbread is SO good and I can't wait to make the dressing with it again.
I plan on taking lots of pictures of our goodies, so I'll be sure and share them here! And Friday is Christmas Decoration Day! I got some new ornaments and a few other things to change up our decorations this year, so I'll be sure and share that too!
I hope everyone has a great week and a Happy Thanksgiving!
meg
10/16/2010
New project!
It is a GORGEOUS fall day here in Nashville, and I've started a new project. I was really inspired by Julie and Julia and decided that I, too, wanted to cook my way through a cookbook. I have a whole shelf of them that I rarely ever try recipes from, and decided that needed to change!
So, I'll be cooking through Giada de Laurentiis's book, Everyday Italian. We all know I'm a huge fan of hers: I DVR both of her cooking shows and watch them in my down time and I often try the things she cooks on her show. Our favorite pork recipe is actually a Giada recipe!

So here we go. My plan is not very strict. I'll cook when I have time, and try to do 2-3 recipes at a time until that gets too ambitious. The first section of the book is Everyday Antipasti and I've done 2 of those for today. I love that each section has a "cooking from the pantry" section how many of these recipes can be done with little or no special grocery shopping since these are items many of us have in our pantry already. I, myself, actually did have to pick up a few things, but not much. And I don't really feel right about posting the actual recipe, since I'm working from a book, but I bet you could find them on the Food Network website.
The first thing I tried was the Tuna and White Bean Salad.

This was very a light and refreshing, simple recipe. There are only a few ingredients: cannellini beans, tuna (it called for dark meat tuna in olive oil, but I had albacore in water, so sue me), red onion, red wine vinegar, s&p. I've never actually thought to put red wine vinegar with tuna, but I loved the tangy zip it gave the salad. This would be a great light lunch, especially over some arugala or romaine.
The next one I did was the Crostini with Sun-Dried Tomatoes and Chickpeas.
I loved everything about this. The texture of the dip is very similar to hummus, which I love, and has the yummy flavor of the sun-dried tomatoes. I didn't have the dried basil or parsley that it called for, so I just used some herbes de provence and I think it tasted great! And then a little garnish with some fresh basil from my garden and some lemon zest. The crunchiness of the baguette complimented the creaminess of the dip very well, and it was easy to make. Who doesn't love just throwing things into the food processor and letting it do its thing? Needless to say, I'll definitely be making this the next time we have people over.An added bonus to this project is that I'm trying new recipes, of course, but it's also giving me a way to practice with the photography. You can only take so many pictures of the dog.
I have the ingredients for the next one, so I'll probably try that tomorrow.
In other news, I'm down 8 pounds total with Weight Watchers, and Billy and I have started Power 90. The weight's not falling off as fast as I'd hoped, but I think this is really setting me up to live a healthy lifestyle from here on out and it's not so much about losing a bunch of weight quickly. Fad diets never work anyway, so I think this is the right program for me. I love that we are working out again and I feel stronger with every workout.
Billy and I also celebrated our 1st wedding anniversary last Sunday, the 10th! It was extremely laid back--we had friends over and hung out outside around the fire pit. I also made homemade marshmallows and graham crackers, but would you know I did not take a single picture! It was really laid back and we had a great time. We even had thawed out the top tier of our wedding cake and ate a slice for breakfast that morning and it was so good! We didn't do the traditional first anniversary paper gifts, unless you count the concert tickets we bought ourselves. Actually, a few weeks ago we went out to the Prime Outlets in Lebanon, TN and got our gifts together. I got a new Coach purse and Billy got a new Coach wallet and some new Oakley sunglasses.
So anyway, that's what's going on with us right now. Talk to you soon! Enjoy the day!
mg
9/28/2010
Snack time!
Happy Tuesday! I just wanted to share with you a little snack recipe that I found on the Weight Watchers website. It's for Roasted Red Pepper Dip--but I tweaked it just a bit because the original recipe called for cilantro and I don't really care for that. Whether or not your watching your weight or just want an easy, tasty snack, I urge you to try it! It's super good!

Mmmmmm! Snacks!
Roasted Red Pepper Dip
15 oz. roasted red peppers
1 c. fat-free sour cream
1/4 c. basil
1/2 tsp. garlic powder
1/2 tsp. salt
1/4 tsp. black pepper
Put all ingredients into food processor and pulse until smooth. Serve with Stacy's Simply Naked Pita Chips and enjoy!!
I think this would also be a great recipe to take to a party, which I might do in the future so I will have something yummy to snack on without wasting all my points...like I did the other day with our friends' queso dip. Oops! And I'm happy to report that even after a week in NYC, I still lost a pound! I am definitely stepping it up this week and it's been a lot easier since I'm at home.
I hope everyone is having a great week, and that the weather is nice where you are!
6/04/2010
Homemade Oatmeal Cream Pies
Happy Friday!
I got bit by the baking bug today. Either that, or Billy kept asking me what I was doing with the butter on the counter that I was letting come to room temperature. We'll really never know.
In my folder of "Recipes To Try", I had a print-out from Tasty Kitchen, a complimentary website to our favorite Pioneer Woman where regular folks like me can submit their delicious recipes. It was a recipe for...Oatmeal Cream Pies. Now, I LOVE Oatmeal Cream Pies. But I also like knowing what is in my food, as opposed to buying treats like these from the grocery store. So I thought I would give this one a whirl.
Here is the link: Oatmeal Cream Pie Recipe. Oddly enough, it was posted by "whatmeganismaking"...sounds like this girl and I have a lot in common!
Here are a few pics I took:

Fresh oatmeal cookies, straight out of the oven!

Oatmeal Cream Pie!

After a pesky husband swooped in a took a bite out of my finished product...I won't name names.
I'm going to be honest here. I really did like this recipe, but I thought the oatmeal cookies were better by themselves!! I will definitely keep this recipe around, but probably just for the oatmeal cookie recipe. They were really easy to make and they made the house smell DELIGHTFUL!
**If you haven't checked out Pioneer Woman, I suggest you click on that handy little link above and give her a visit. Not only is she funny and delightfully quirky, but she has amazingly delicious recipes and even has a photography section--one from which I've learned quite a bit about photography and Photoshop. I've tried out several of her recipes and I'm rarely disappointed. I took these potatoes to our Easter gathering this year and they were a big hit!
Tata for now!
mrs g.
5/22/2010
Yummy Pasta Salad
Happy Saturday, everyone! I wanted to share with you the pasta salad recipe that Billy and I took for a spin last night. We wanted something light and fresh and this hit the spot!
I originally pulled this recipe from a magazine, that I'm guessing is Family Circle--the only clue I got was the familycircle.com on the bottom corner of the page. This was a reader recipe that was sent in and I LOVE any kind of pasta salad so I decided to try it out.

Grilled Chicken Pasta Salad
1 pound rotini
2 pounds thin-sliced chicken cutlets
2 tablespoons lemon juice
1 large sweet red pepper, cored, seeded, and diced
1 large green pepper, cored, seeded, and diced
1 medium-size red onion, halved and thinly sliced
2 scallions, trimmed and thinly slided
2 tablespoons minced fresh dill
1 cup light mayonnaise
1/2 cup red wine vinegar
1/2 cup honey
1 teaspoon prepared mustard
1 teaspoon sugar
1 teaspoon onion powder
1 teaspoon dried parsley flakes
1/4 teaspoon salt
1/4 teaspoon black pepper
1/2 cup canola oil
1. Cook pasta following package directions. Drain.
2. While pasta is cooking, heat grill pan or broiler. Sprinkle chicken with the lemon juice and grill or broil for about 2 minutes per side or until internal temperature reads 160 degrees on an instant-read thermometer. Set aside and let cool.
3. When cool, cut chicken into bite-size pieces and mix with cooled pasta in a large bowl. Add diced peppers, onion, scallions, and dill.
4. In a medium-size bowl, whisk mayo, vinegar, honey, mustard, sugar, onion powder, parsley flakes, salt and black pepper. Gradually whisk in oil.
5. Pour mayonnaise mixture over the pasta and chicken and toss. Refrigerate until ready to serve.
Now I have to admit that I improvised a little on the recipe. I didn't have a red onion, so I used Vidalia onion. I did not have fresh dill, onion powder, or dried parsley flakes. I used dried dill weed in my sauce. And I only used half of the oil. I like how mine turned out but I'm curious how different it would taste if you follow the recipe exactly.
Things I liked about it:
- The creamy yet tangy and light dressing.
- The fresh crunch of the veggies.
- The pasta--duh.
I'm not really a chicken fan, but I do like how it added some good protein in there. I think it would also be great with shrimp.
Billy mentioned this would be a good dish for a summer picnic, and I completely agree. This is one of those dishes that ABSOLUTELY tastes better the next day, when the sauce has had time to hang out and all the pasta is nice and cold.
Next up: Homemade Oatmeal Cream Pies!!!
4/28/2010
Roast It Yourself...
One of my favorite things to do on a quiet weekend morning is to get up and watch cooking shows--shocking, I know. A few years ago, I happened to be doing just that, and happened across Ellie Krieger's Healthy Appetite on FoodNetwork. On that particular episode she was making her Fettuccine with Creamy Red Pepper-Feta Sauce and it looked yummy and healthy, so I thought I would try it out.
Let me tell you, I completely fell in love with that dish. It is a staple in my repertoire and I make it often. But I always made it with the called-for jar of peppers. Until Saturday.
I had a big bag of sweet red peppers, rainy weather, and an empty house, so I decided to roast the peppers and play with my camera a little bit. It's really easy, and I totally have pictures of the whole process but for some reason my computer isn't cooperating with me at the moment.
I'll walk you through it anyway...
First, lay out your peppers in a single layer on a cookie sheet and stick it under the broiler. The peppers will bubble, blister, hiss, sizzle, squeal, and make all sorts of noises you didn't think they should make.
When they are all bubbly and brown on one side (about 10-15 minutes), flip'em over and roast the other side.
Then, put all the peppers in a big bowl and cover the bowl tightly with plastic wrap. Leave them in there for at least 30 minutes or so. This way they'll be cool enough to handle, and being in that bowl under the plastic wrap will steam them and make it SUPER easy to peel them.
Finally, peel all of the skin off, pull out the stem, and clean the pepper of all the seeds. If you don't use all of the peppers right then, you can store them in olive oil in an air-tight container.
I used about 3 of my roasted, cleaned peppers and made my favorite pasta, and it was a million times better than with the peppers out of the jar...totally worth the extra effort! With that, friends, I leave you with this photo of my finished pasta:

And believe me, it was every bit as good as it looks.
I hope everyone is having a superb week!
mg
3/27/2010
Mmmmmmmmuffins
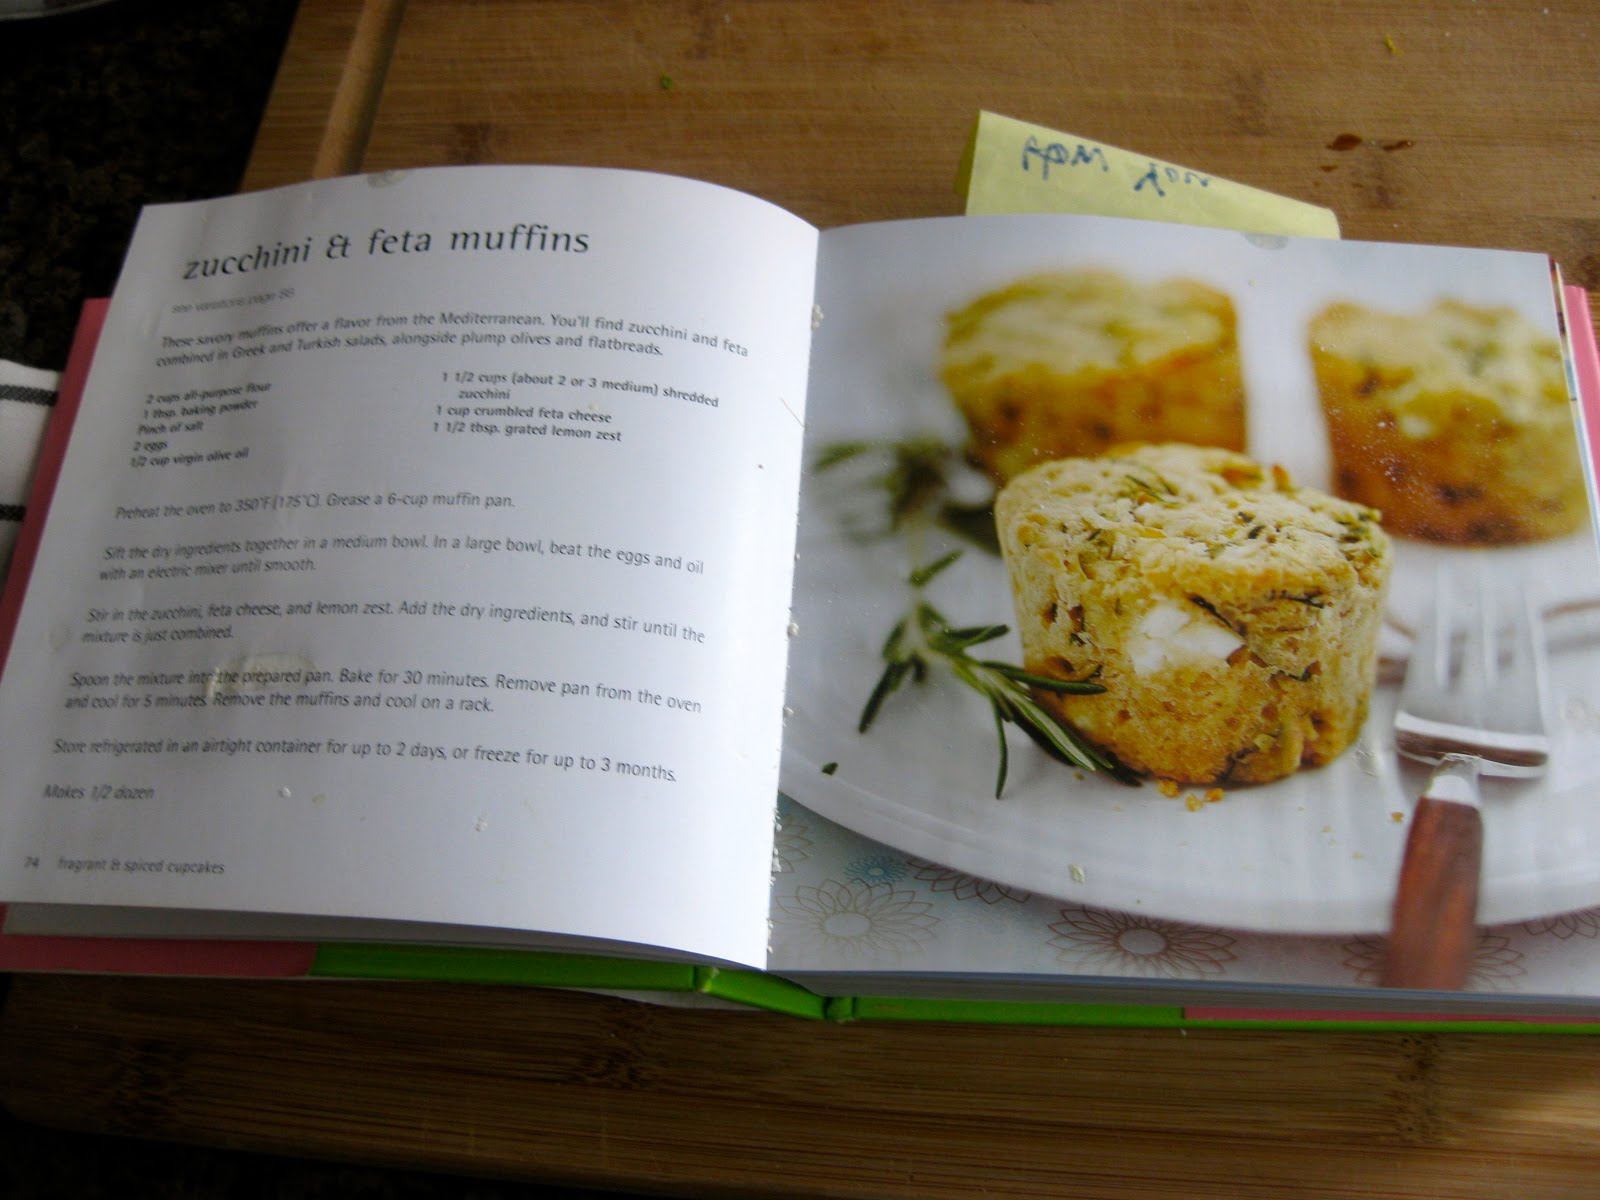
A few years ago for my birthday, one of my work friends gave me this cookbook: 500 Cupcakes!
While I haven't tried as many of the recipes as I would like, I have definitely found a favorite...for life. The Zucchini & Feta Muffins--these muffins are to die for!

Billy mentioned that this was one of the ways I reeled him in...I think I brought one of these to him at work when we first started giving each other that sideways look...hehe. I try to make them for him every once in a while. He loves them. They are especially good right out of the oven with butter. Mmmmmmmm.
Dogs love them, too! Murph was very insistent that I let him sample a piece, just to make sure they were ok. They passed the test.

And for the record, I cannot WAIT to get my hands on a DSLR so I can take better food pictures...
So, if you happen to come across any of those 500 cookbooks, I definitely recommend picking up one or two. I have the appetizer one as well, and there are some yummy treats in there, too!
3/23/2010
I want to go to there...
I'm sure I've mentioned before that I watch a lot of Food Network. In particular, I'm a giant huge-normous fan of Giada De Laurentiis. At the moment, I'm watching some episodes of Giada at Home that have been collecting dust on our DVR. Have you ever watched the show?
I couldn't find many pictures of the house, but some of the images they have on her show are enough to make even the luckiest girl go green with envy. On the beach, the lawns are perfectly manicured, and I absolutely adore her kitchen.

You can see the waves from her little window there. And I just love how the bottom cabinets are dark while the top cabinets are white with glass fronts. And the tile backsplash. Everything is just so light and airy! Makes me want to go remodel the kitchen...JUST KIDDING, BILLY!!
Really, you should go watch it. You might learn how to cook something yummy, too!
2/07/2010
Pork it over...
My DVR is pretty full of cooking shows, mainly those by Giada DeLaurentiis and Ina Garten. Something about their shows relaxes me and I'll often plop down on the couch and watch a show or two to unwind. During one of those instances, Giada was whipping up a tasty pork recipe so I decided I'd print out that recipe and try it. Billy and I had a large package of pork chops in the freezer and we wanted to try a new way to cook them and boy were we pleased with this recipe!! I served it with whipped potatoes and it was delish!
Recipe from Giada DeLaurentiis
Ingredients:
1/4 c olive oil
4 boneless (2-inch-thick) pork chops (about 2 pounds total)
3/4 tsp salt, plus more for seasoning meat
3/4 tsp freshly ground black pepper, plus more for seasoning meat
2 fennel bulbs with fronds, thinly sliced (about 2 cups)
2 large shallots, thinly sliced
1/3 c chopped fresh flat-leaf parsley, plus 1/3 c
1/2 c white wine
1 (28 oz) can diced tomatoes, with juices
1/2 lemon, zested
2 tbs capers
Directions:
In a large, heavy skillet heat the olive oil over high heat. Season the pork chops with salt and pepper. Add teh pork to the pan and brown on both sides, about 4 minutes each side. Remove the pork from the pan, cover loosely with foil, and set aside.
Add the fennel, shallots, and 1/3 c parsley to the pan and cook over medium heat until beginning to brown, about 5 minutes. Add the wine. Using a wooden spoon, scrape the brown bits off the bottom of the pan. Add the tomatoes and stir. Add the pork back into the pan, nestling the chops between the fennel and tomatoes so they are mostly submerged in the pan juices. Cook until the fennel is tender and the pork is done, about 12 to 15 minutes.
Place the pork on a serving dish. To finish the sauce, add the lemon zest, remaining 1/3 cup parsley, capers, and 3/4 tsp each of salt and pepper. Stir to combine. Spoon over the pork chops and serve immediately.
We also tried Pork Chops Stuffed with Sun-Dried Tomatoes and Spinach, also from Giada. They were super yummy! If your pork chops are really thick like ours were, stick them in the oven for a bit to finish cooking them so you won't burn the outside or any of the stuffing. The pork turned out perfectly and the stuffing was so creamy and flavorful. Mmmm!
Enjoy!
12/22/2009
Rollin' and Whippin'
This past Saturday, my fabulous friend Catherine invited me and the girls over for Girls' Night In Potluck--a night of good company, good wine, and of course, good food! I immediately knew what I was going to make: Asparagus Roll-ups and Whipped Potatoes. The girls loved them SO much that I'll tell YOU how to make them too!
ASPARAGUS ROLL-UPS
Ingredients:
White Bread (1 slice of bread makes 2 roll-ups)
8 oz package of cream cheese (softened)
Asparagus
2-3 tbsp melted butter
Finely grated Parmesan cheese
Salt
Pepper
Herbs de Provence
First, decide how many roll-ups you want to make. Like I said earlier, 1 slice of white bread makes 2 roll-ups. I decided 4 per person was a good number, so I would need 8 slices of bread. It helps if the bread is not super-fresh.
Once you decide how many you want to make, get your bread out and start slicing off the crusts. Aim to end up with a square-shaped piece of bread, or something pretty close.

Now, get your rolling pin out. Roll each slice of bread out until it is about 1/4" in thickness. It may end up a little wonky-looking...

So get out your paring knife and slice off those crooked parts. Then slice all the slices of bread in half DIAGONALLY!

Next, prepare your asparagus. If you are using canned, make sure you drain it really well or else everything will end up soggy. I used frozen, and you just throw them into boiling water for a few minutes. Don't let them boil too long or they will be mushy! You can also grill your fresh aparagus or flash boil them and then shock them in ice-cold water to stop the cooking process and retain their color. Whatever floats your boat! Then cut them to about 2-inch-long pieces.

Now prepare your cream cheese. I usually add around a 1tsp salt, 1/2 tsp pepper (you can use freshly ground black pepper or white pepper), and about a tablespoon of Herbs de Provence. I like HDP because it has a great mix of a bunch of herbs like Rosemary and Thyme. If that's not enough, keep adding seasoning to taste.
Now GET ROLLIN'.
Smear each triangle of bread with your cream cheese mixture.
Place 3-4 pieces of asparagus on the cream cheese-coated bread in the middle. Fold over the left side of the bread.

Now fold over the right side. The cream cheese MAGICALLY makes the roll-up stay rolled!

After you have rolled all of your roll-ups, place them on a foil-lined baking sheet. Make sure your oven is pre-heated to around 400.
Brush a little bit of the melted butter onto each roll-up and then dust each one with the Parmesan cheese.
Bake those little suckers for about 20 minutes, or until the tops of the roll-ups are golden brown.
Enjoy! They are great!

WHIPPED POTATOES
There's only one small trick to these. I just started these potatoes like you normally do: peeled and chopped potatoes in salted, boiling water and boil until fork-tender.
Now BEFORE you drain your potatoes, combine about a cup of your cooking liquid with about 1/3 cup dry milk. Mix it really good. Drain your potatoes.
Put your potatoes back into the pot and gradually add the milk as you beat them with a hand mixer. Adding the mixture gradually helps avoid ending up with potato soup!
Now beat the potatoes with your mixer on the highest speed, until they look soft and light. Add salt, pepper, and a few tablespoons of butter and that's it!

Try them out, I hope you enjoy them!
Billy helped, too. Thanks babe!
Now off to go shopping with my mom and brother. Bye!
mg
ASPARAGUS ROLL-UPS
Ingredients:
White Bread (1 slice of bread makes 2 roll-ups)
8 oz package of cream cheese (softened)
Asparagus
2-3 tbsp melted butter
Finely grated Parmesan cheese
Salt
Pepper
Herbs de Provence
First, decide how many roll-ups you want to make. Like I said earlier, 1 slice of white bread makes 2 roll-ups. I decided 4 per person was a good number, so I would need 8 slices of bread. It helps if the bread is not super-fresh.
Once you decide how many you want to make, get your bread out and start slicing off the crusts. Aim to end up with a square-shaped piece of bread, or something pretty close.

Now, get your rolling pin out. Roll each slice of bread out until it is about 1/4" in thickness. It may end up a little wonky-looking...

So get out your paring knife and slice off those crooked parts. Then slice all the slices of bread in half DIAGONALLY!

Next, prepare your asparagus. If you are using canned, make sure you drain it really well or else everything will end up soggy. I used frozen, and you just throw them into boiling water for a few minutes. Don't let them boil too long or they will be mushy! You can also grill your fresh aparagus or flash boil them and then shock them in ice-cold water to stop the cooking process and retain their color. Whatever floats your boat! Then cut them to about 2-inch-long pieces.

Now prepare your cream cheese. I usually add around a 1tsp salt, 1/2 tsp pepper (you can use freshly ground black pepper or white pepper), and about a tablespoon of Herbs de Provence. I like HDP because it has a great mix of a bunch of herbs like Rosemary and Thyme. If that's not enough, keep adding seasoning to taste.
Now GET ROLLIN'.
Smear each triangle of bread with your cream cheese mixture.
Place 3-4 pieces of asparagus on the cream cheese-coated bread in the middle. Fold over the left side of the bread.

Now fold over the right side. The cream cheese MAGICALLY makes the roll-up stay rolled!

After you have rolled all of your roll-ups, place them on a foil-lined baking sheet. Make sure your oven is pre-heated to around 400.
Brush a little bit of the melted butter onto each roll-up and then dust each one with the Parmesan cheese.
Bake those little suckers for about 20 minutes, or until the tops of the roll-ups are golden brown.
Enjoy! They are great!

WHIPPED POTATOES
There's only one small trick to these. I just started these potatoes like you normally do: peeled and chopped potatoes in salted, boiling water and boil until fork-tender.
Now BEFORE you drain your potatoes, combine about a cup of your cooking liquid with about 1/3 cup dry milk. Mix it really good. Drain your potatoes.
Put your potatoes back into the pot and gradually add the milk as you beat them with a hand mixer. Adding the mixture gradually helps avoid ending up with potato soup!
Now beat the potatoes with your mixer on the highest speed, until they look soft and light. Add salt, pepper, and a few tablespoons of butter and that's it!

Try them out, I hope you enjoy them!
Billy helped, too. Thanks babe!
Now off to go shopping with my mom and brother. Bye!
mg
Subscribe to:
Posts (Atom)